Search Products
Stay Connected:


The cart is empty.
Cart contains {{shoppingcart.totalQuantity}} Item(s) Total:
{{shoppingcart.subtotal}}
{{shoppingcart.total}}


Browse by Category
Useful Links
Tips for speeding up your computer
NOTE: M-Tech recommends doing these steps after you have completely setup your computer and have nothing left to do. These tweaks will finish with a complete system image to restore back to in case of corruption to your drive. So you will want to make sure that nothing more is left to be done to your system before completing the System Image.
M-Tech Laptops secret weapon is it quality, it gives tremendous speed and longevity to the same configuration that may disappoint laptop owners of other brands. Still, every secret weapon has a good amount of ammo to make it even more effective. Here is a list of tweaks that can make the fastest computer ever even faster. Instead of posting instructions to perform the tweaks, we are listing links to allow you to review if the tweaks are indeed something you want to proceed with. Many tweaks give you speed at the cost of a Windows function that you may choose to keep. There is no free lunch, every feature of true worth costs your computer resources, AKA speed. So, here are links when available to give you the understanding to choose to ignore or apply tweaks that can make the worlds fastest computer even more responsive. We hope you also appreciate the work the authors of these web pages went thru to bring you these tips.
Tweak 1: Turn off Indexing, it hogs resources and your speed. Should you turn it off, here is a great page to help you decide and instructions to turn it off.
Tweak 2: Turn off Boot Execute, If you own an M-Tech you likely have Solid State Drives. Solid State drives are great but do have one weakness, they suffer from degradation to the storage integrity over time from the writes it receives. Too many writes will shorten your drives useful lifespan. M-Tech technical advisers go thru a great deal of effort and planning to help you configure your SSD to last much longer than the average SSD. One aspect of this is to turn off the Automatic Autocheck of your drives for disk errors. Autocheck is great if you use old fashioned HDD's but introduces a lot of extra writes that will hasten your SSD's death. We strongly recommend turning it off. Here is how. It's a bit tedious but well worth the effort
 Tweak 3: Turn off Windows fast Startup. Every time you turn off your laptop to travel or to perhaps clear errors or commit changes to your system, you may wonder why the fail-safe method of rebooting doesn't seem to help much. The reason is you are not really turning off the computer but instead Windows has let it slip into Hibernation. Hibernation mode has a long history of being awful. Even if Hibernation doesn't hang you up sometime in the future it will hog up huge amounts of your primary drive with what is named hiberfil.sys file. (Don't bother finding it, they have it hidden) As you likely know, if you talked to a technical adviser, you already know how disastrous exceeding the half-full mark of your SSD is to your speed. You may think your drives used space is below the 50% mark but not realize that hibernation is secretly stealing your drive space and taking you past the 50% mark. So here is our quick instruction to turn it off.
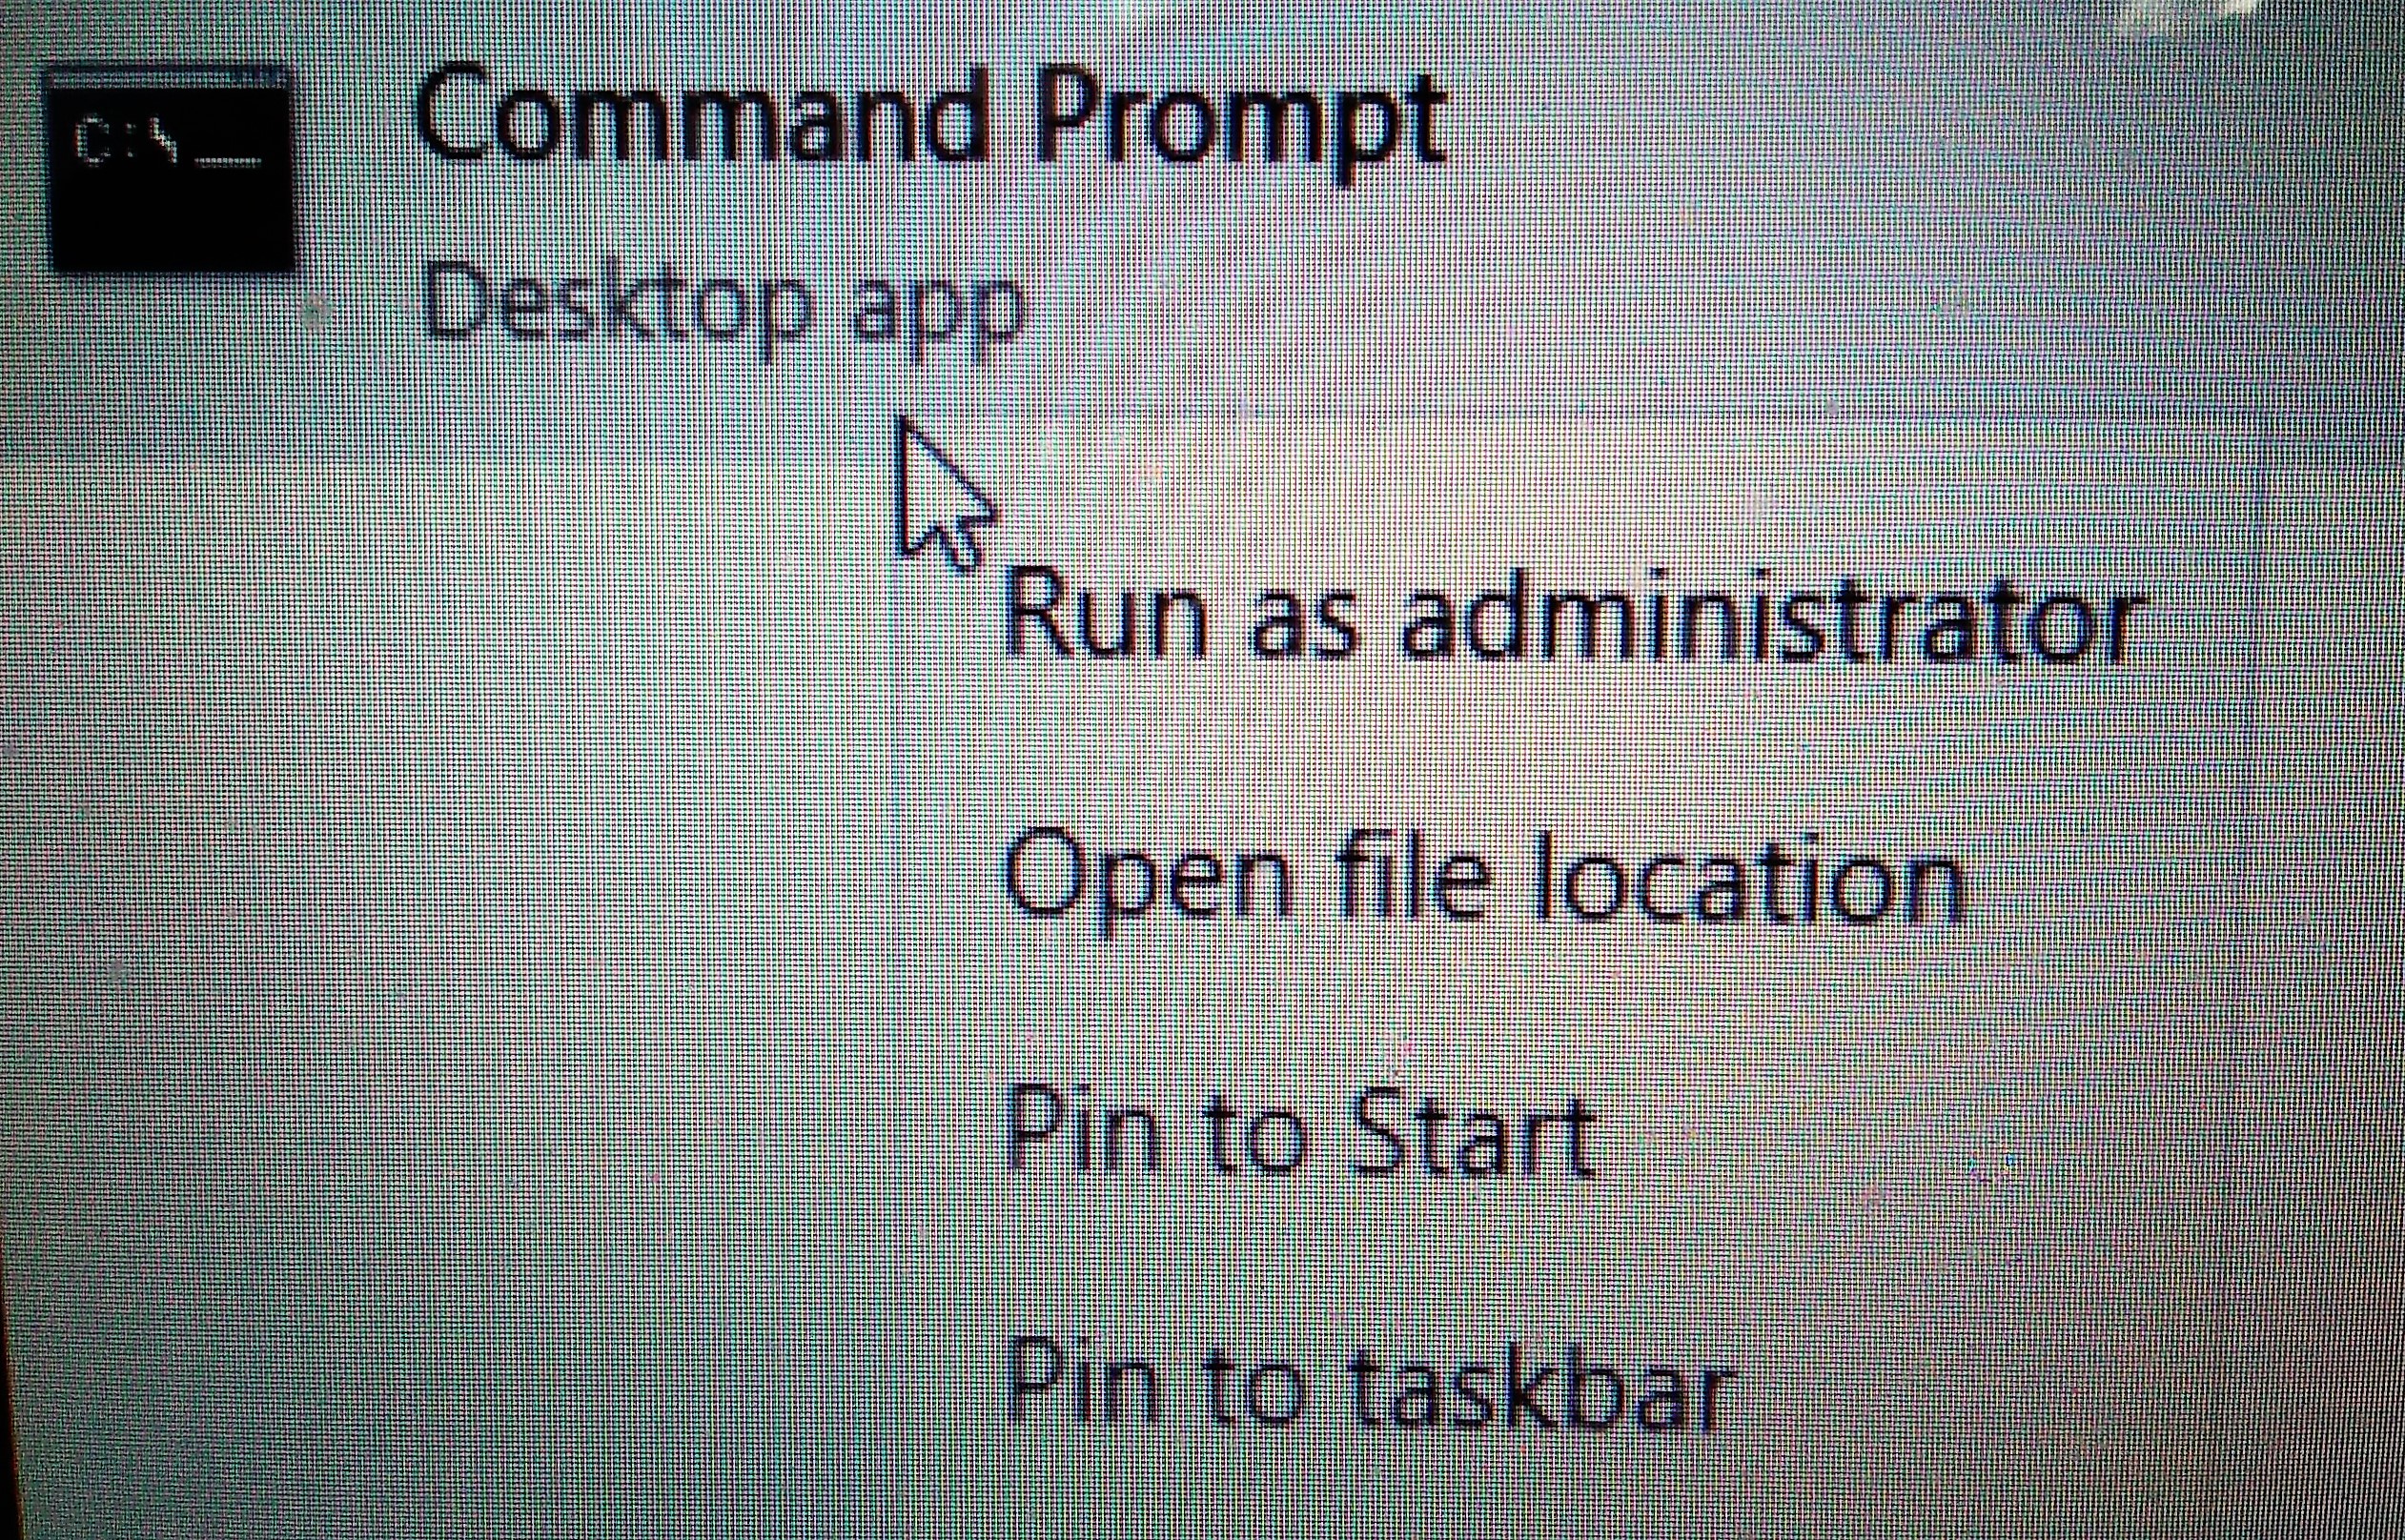
In the search widows type CMD, now it should show this in the menu option. Don't just click it. Hover your mouse over the CMD menu option and do a right click. Then choose the menu option 'Run as administrator'
Now you have a command line prompt open on your computer. type CD.. then hit enter.Type CD.. again then hit enter. You could now be at the base C:/ prompt. Now just paste powercfg.exe -h off and hit enter. That is all you need to do. Keep in mind, that many major updates from Microsoft will turn this feature back on, so you may want to perform this quick task after every major update.
Tweak 4: Move your User directory from the C:/ drive to a D:/ drive (or whatever drive you're moving the data to.) This saves drive space and it protects your data from any issues that can happen to the primary drive of your computer. Just right-click the User folder you are currently moving then follow each step outlined below
1: Right click the User directory to be moved
2: Select the Properties option
3: Click the Location tab
4: Change the C to a D or whatever drive letter you are saving the data to)
5: Click Move
6: Select yes when asked if you want that directory created for you
7: Select Yes when Windows offers to move all your files for you
Now you should verify your data was moved and the original directory no longer exists on the C drive. If it is still there it may be because Windows is using it for system files. This is fine as long as your data is moved to the new location.
Move OneDrive if it is going to be used
Change Where OneDrive Saves Files
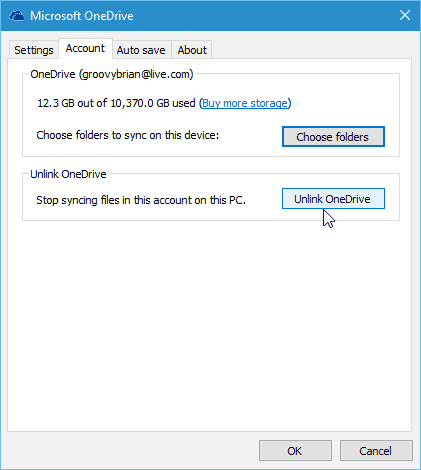
To get started, right-click the OneDrive icon in the system tray and choose Settings. Then unlink OneDrive from your PC. The screen to sign back into OneDrive will come up, but ignore that for now.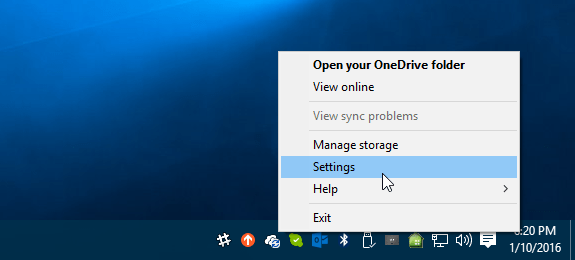
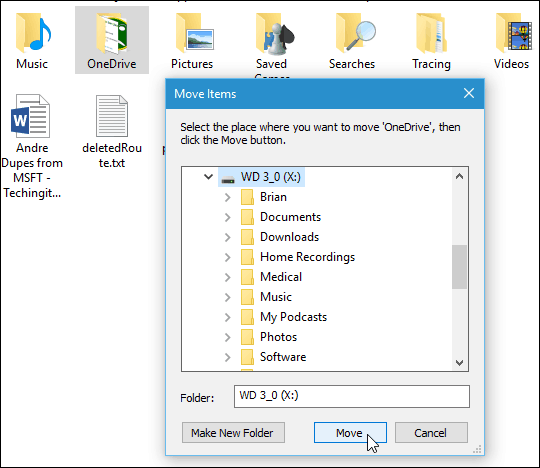
Next, open File Explorer and select your OneDrive folder. Use the Move to button under the Home tab on the Ribbon to place it in a new location.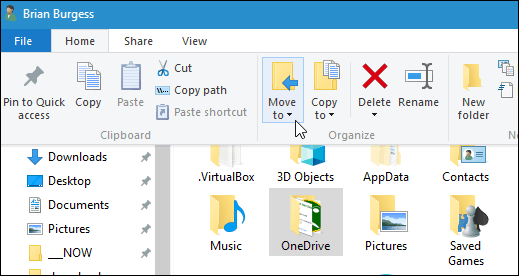
Select Choose location from the drop-down menu to find the external drive I want to move it.
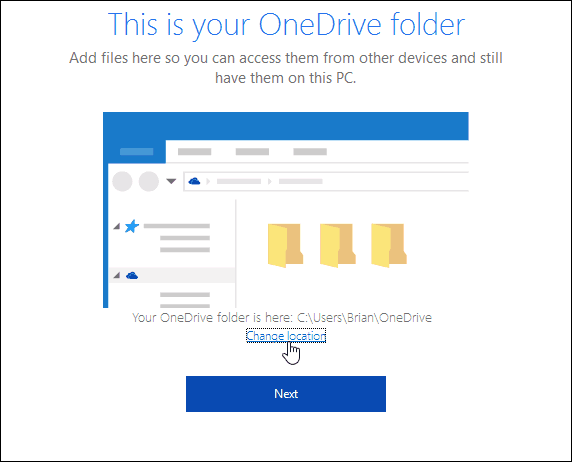
After you have the folder moved to its new spot, sign back into OneDrive. While going through the setup wizard, you can change the location of your save folder.
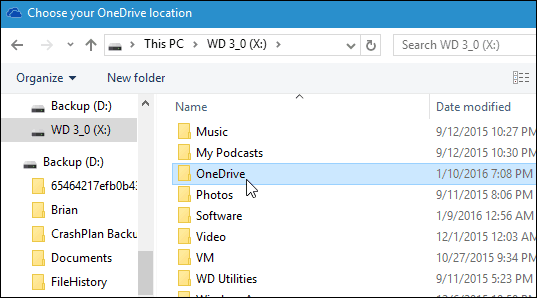
Then choose your OneDrive folder from wherever you moved it.

When this dialog message comes up, just click Use this location since your data will be merged.
If you don’t want to move the OneDrive folder location, another thing to consider is changing the folders you’re syncing to your PC.
Tweak 5: Turn off visual effects to gain back some resources, Like everything else, you have to choose to either look good or feel good. In Windows, trying for both typically fails. Follow this link for a decent explanation of how to choose one over the other. http://www.thewindowsclub.com/disable-visual-effects-windows While you have the Window option open to make this change, you will want to keep it up on your screen for the next tip.
 Tweak 6: Pagefile Disable or Move. While the debate of whether to turn off page filing altogether may never be settled, nobody disagrees that if you have a 2nd drive and it is an SSD, you can boost performance by telling Windows not to use the already overworked C drive as your virtual RAM drive and Pagefile drive. Move that resource from the C drive to a fast SSD or super fast PCIe NVMe drive and you not only free up valuable space from your C drive and eliminate excess writes from it but you also speed up your entire system when you have started to run low on RAM resources. Here is a link to a graphically based instruction then we will include a text version.
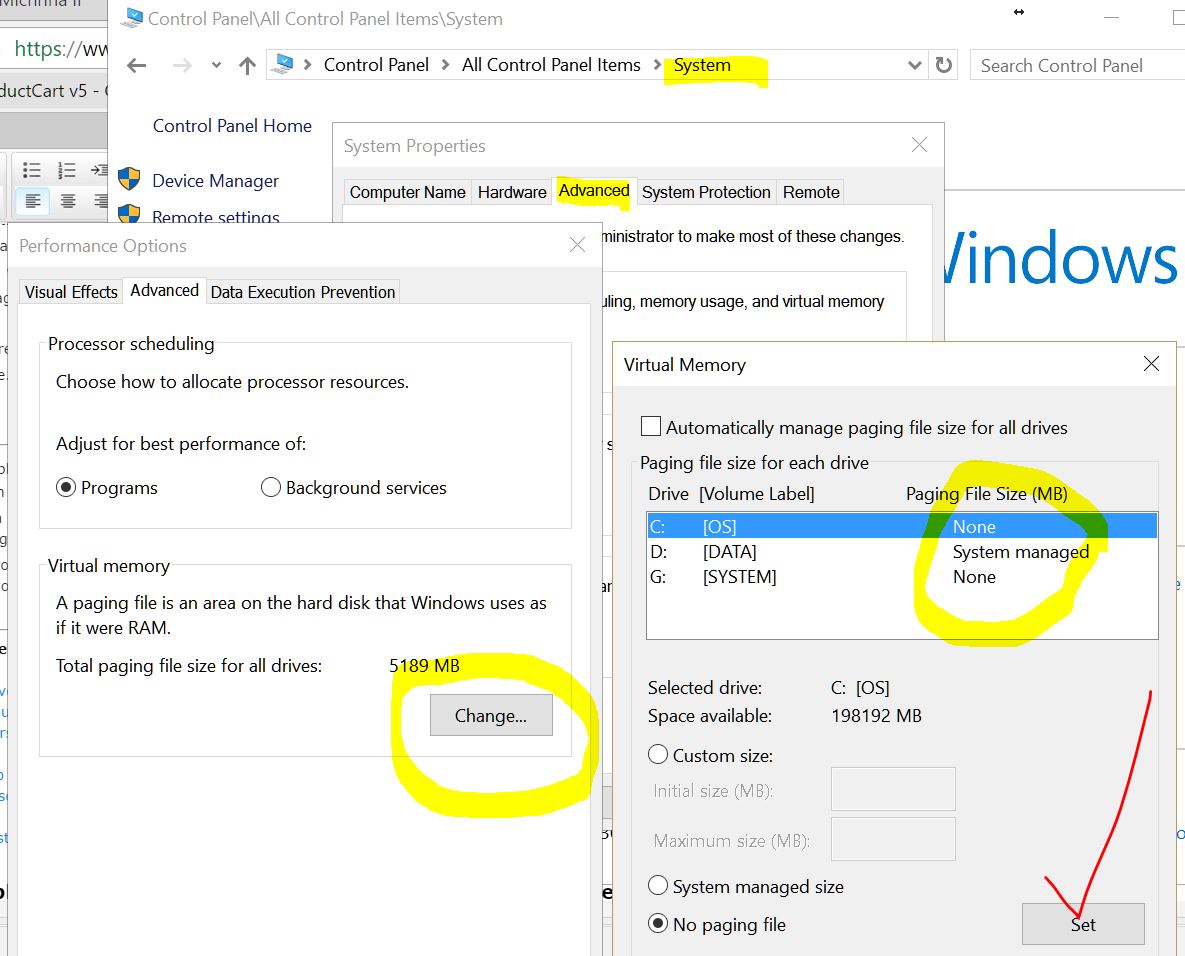
1: While you are still in the Control Panel window you opened to choose Best Performance over Visual, you are also where you need to be to make this change. The next tab over that says Advanced, then within that window choose Virtual memory.
2: Un-check the "Automatically manage paging file size for all drives setting (Win 7).
3: Click on the drive you want to move pagefile.sys to click on System Managed Size. Click 'SET'
4: Click on the drive currently holding pagefile.sys (probably C:)
5: Click on 'No paging file'. click 'Set' click OK.
Tweak 7 If you plan on using power hungry programs then it behooves you to adjust how Windows manages your power. There are two options here. Power options and Power Plan. Power options let you choose when and how your laptop chooses to sleep etc.. Power Plan however actually controls how much energy is allotted to things like your CPU, Video, and drives. Leaving this balanced or power saver will short-circuit the performance of your program. especially Dragon NaturallySpeaking.
Keep in mind you can create a power plan for programs when plugged into the wall and one for when your flying and need battery life. We recommend choosing High for all your needs until you actually need the battery life. Never run your computer on anything less than High performance if you want full power from your computer. Here is how to change these easily
Test and score your computer: It is a good idea to have your laptop scored. Windows 7 users can have this done just by going to Control Panel/System but Window 8 and 10 users lose the nice easy graphical means to see there score but the testing method to compare your laptop to other Window computers still exists. here is how.
Here is a sample of what you want to look for, This was done on afour-year-Old M8600

How to interpret the score: Here is a link from Microsoftto
understand
your systems score . According to the article says 5.9 but it really is 7.9 is the highest possible score and within Win 7 you would never get a final score of 7.9 because the tests had to leave room for faster systems. You will see 7.9 hardware sub-scores but not a final score. When you see scores over 7.9 you will recognize that these are not hardware score but software scores. The score above is a system that is now four years old, a testament to the speed you get when you focus on quality. In any event, Microsoft declares any system that the lowest score is 6.5 or above to be a Extreme System. FYI, no computer would be let out of production if it had a score of 6.5. 99% of M-tech Laptops will score 7.7 or better.
Running this score now and saving it for future use is a good way to know if you are experiencing hardware issues or software issues. if your scores are still high across the board yet your computer runs funny, you know the issue is with software or settings and not the computer itself. use this test to prove to yourself and others that your laptop is still in good shape.
In conclusion, the internet offers numerous modifications to customize your computer. If you have a particular need for these, feel free to explore them. However, it's advisable to create a system image to preserve your current good configuration before making any changes. Simply search for 'Backup' in Windows, and you'll find an option for Windows 7 backup and restore. Select it, and then choose 'System Image' on the left side of the window. The system will guide you through the process. Save the system image to a secondary or even a tertiary drive, or an external drive. This way, if your enhancements go awry, you can revert to the point where everything functioned smoothly.
Good luck and don't feel shy about asking for advice.
To make Windows 11 run smoother, consider the following tips:
- Disable Startup Apps: Prevent unnecessary programs from running at startup to speed up boot time and overall system performance.
- Use Storage Sense: Automatically clean up temporary files and free up space by enabling Storage Sense in the Settings app.
- Turn Off Visual Effects: Reduce the load on your system by disabling visual effects that are not needed for your daily tasks.
- Manage Startup Programs: Use Task Manager to manage startup programs and disable any that you do not need.
- Check for Updates: Regularly check for Windows updates to ensure your system is running the latest version and patches.
M-Tech Laptops secret weapon is it quality, it gives tremendous speed and longevity to the same configuration that may disappoint laptop owners of other brands. Still, every secret weapon has a good amount of ammo to make it even more effective. Here is a list of tweaks that can make the fastest computer ever even faster. Instead of posting instructions to perform the tweaks, we are listing links to allow you to review if the tweaks are indeed something you want to proceed with. Many tweaks give you speed at the cost of a Windows function that you may choose to keep. There is no free lunch, every feature of true worth costs your computer resources, AKA speed. So, here are links when available to give you the understanding to choose to ignore or apply tweaks that can make the worlds fastest computer even more responsive. We hope you also appreciate the work the authors of these web pages went thru to bring you these tips.
Tweak 1: Turn off Indexing, it hogs resources and your speed. Should you turn it off, here is a great page to help you decide and instructions to turn it off.
Tweak 2: Turn off Boot Execute, If you own an M-Tech you likely have Solid State Drives. Solid State drives are great but do have one weakness, they suffer from degradation to the storage integrity over time from the writes it receives. Too many writes will shorten your drives useful lifespan. M-Tech technical advisers go thru a great deal of effort and planning to help you configure your SSD to last much longer than the average SSD. One aspect of this is to turn off the Automatic Autocheck of your drives for disk errors. Autocheck is great if you use old fashioned HDD's but introduces a lot of extra writes that will hasten your SSD's death. We strongly recommend turning it off. Here is how. It's a bit tedious but well worth the effort
Tweak 3: Turn off Windows fast Startup. Every time you turn off your laptop to travel or to perhaps clear errors or commit changes to your system, you may wonder why the fail-safe method of rebooting doesn't seem to help much. The reason is you are not really turning off the computer but instead Windows has let it slip into Hibernation. Hibernation mode has a long history of being awful. Even if Hibernation doesn't hang you up sometime in the future it will hog up huge amounts of your primary drive with what is named hiberfil.sys file. (Don't bother finding it, they have it hidden) As you likely know, if you talked to a technical adviser, you already know how disastrous exceeding the half-full mark of your SSD is to your speed. You may think your drives used space is below the 50% mark but not realize that hibernation is secretly stealing your drive space and taking you past the 50% mark. So here is our quick instruction to turn it off.In the search widows type CMD, now it should show this in the menu option. Don't just click it. Hover your mouse over the CMD menu option and do a right click. Then choose the menu option 'Run as administrator'
Now you have a command line prompt open on your computer. type CD.. then hit enter.Type CD.. again then hit enter. You could now be at the base C:/ prompt. Now just paste powercfg.exe -h off and hit enter. That is all you need to do. Keep in mind, that many major updates from Microsoft will turn this feature back on, so you may want to perform this quick task after every major update.
Tweak 4: Move your User directory from the C:/ drive to a D:/ drive (or whatever drive you're moving the data to.) This saves drive space and it protects your data from any issues that can happen to the primary drive of your computer. Just right-click the User folder you are currently moving then follow each step outlined below
1: Right click the User directory to be moved
2: Select the Properties option
3: Click the Location tab
4: Change the C to a D or whatever drive letter you are saving the data to)
5: Click Move
6: Select yes when asked if you want that directory created for you
7: Select Yes when Windows offers to move all your files for you
Now you should verify your data was moved and the original directory no longer exists on the C drive. If it is still there it may be because Windows is using it for system files. This is fine as long as your data is moved to the new location.
Move OneDrive if it is going to be used
Change Where OneDrive Saves Files
To get started, right-click the OneDrive icon in the system tray and choose Settings. Then unlink OneDrive from your PC. The screen to sign back into OneDrive will come up, but ignore that for now.
Next, open File Explorer and select your OneDrive folder. Use the Move to button under the Home tab on the Ribbon to place it in a new location.
Select Choose location from the drop-down menu to find the external drive I want to move it.
After you have the folder moved to its new spot, sign back into OneDrive. While going through the setup wizard, you can change the location of your save folder.
Then choose your OneDrive folder from wherever you moved it.
When this dialog message comes up, just click Use this location since your data will be merged.
If you don’t want to move the OneDrive folder location, another thing to consider is changing the folders you’re syncing to your PC.
Tweak 5: Turn off visual effects to gain back some resources, Like everything else, you have to choose to either look good or feel good. In Windows, trying for both typically fails. Follow this link for a decent explanation of how to choose one over the other. http://www.thewindowsclub.com/disable-visual-effects-windows While you have the Window option open to make this change, you will want to keep it up on your screen for the next tip.
Tweak 6: Pagefile Disable or Move. While the debate of whether to turn off page filing altogether may never be settled, nobody disagrees that if you have a 2nd drive and it is an SSD, you can boost performance by telling Windows not to use the already overworked C drive as your virtual RAM drive and Pagefile drive. Move that resource from the C drive to a fast SSD or super fast PCIe NVMe drive and you not only free up valuable space from your C drive and eliminate excess writes from it but you also speed up your entire system when you have started to run low on RAM resources. Here is a link to a graphically based instruction then we will include a text version.1: While you are still in the Control Panel window you opened to choose Best Performance over Visual, you are also where you need to be to make this change. The next tab over that says Advanced, then within that window choose Virtual memory.
2: Un-check the "Automatically manage paging file size for all drives setting (Win 7).
3: Click on the drive you want to move pagefile.sys to click on System Managed Size. Click 'SET'
4: Click on the drive currently holding pagefile.sys (probably C:)
5: Click on 'No paging file'. click 'Set' click OK.
Tweak 7 If you plan on using power hungry programs then it behooves you to adjust how Windows manages your power. There are two options here. Power options and Power Plan. Power options let you choose when and how your laptop chooses to sleep etc.. Power Plan however actually controls how much energy is allotted to things like your CPU, Video, and drives. Leaving this balanced or power saver will short-circuit the performance of your program. especially Dragon NaturallySpeaking.
Keep in mind you can create a power plan for programs when plugged into the wall and one for when your flying and need battery life. We recommend choosing High for all your needs until you actually need the battery life. Never run your computer on anything less than High performance if you want full power from your computer. Here is how to change these easily
Test and score your computer: It is a good idea to have your laptop scored. Windows 7 users can have this done just by going to Control Panel/System but Window 8 and 10 users lose the nice easy graphical means to see there score but the testing method to compare your laptop to other Window computers still exists. here is how.
- Windows built in Benchmark
- Open an administrative command prompt (Do a right click on CMD and open as admin) and type
winsat formal -v -xml c:\winstatresults. xml This will run the full formal test in verbose mode and provide an XML output of the results. It is in the report, you will see the scores you seek. To see a little more friendly version of the scores go here for the report and view in an XML viewer. c:\winstatresults.xml If you want to run just a subset of the tests, typewinsat /? see all of the arguments and options.
Here is a sample of what you want to look for, This was done on a
How to interpret the score: Here is a link from Microsoft
Running this score now and saving it for future use is a good way to know if you are experiencing hardware issues or software issues. if your scores are still high across the board yet your computer runs funny, you know the issue is with software or settings and not the computer itself. use this test to prove to yourself and others that your laptop is still in good shape.
In conclusion, the internet offers numerous modifications to customize your computer. If you have a particular need for these, feel free to explore them. However, it's advisable to create a system image to preserve your current good configuration before making any changes. Simply search for 'Backup' in Windows, and you'll find an option for Windows 7 backup and restore. Select it, and then choose 'System Image' on the left side of the window. The system will guide you through the process. Save the system image to a secondary or even a tertiary drive, or an external drive. This way, if your enhancements go awry, you can revert to the point where everything functioned smoothly.
Good luck and don't feel shy about asking for advice.
