Search Products


Browse by Category
Useful Links
How to re-install Windows 10
Once more, M-Tech's Technical Support Team sent out an e-mail that was helpful enough we wanted to include it in our online support. Please listen in on an actual support reply to a valued M-Tech customer.
I will be explaining how to reinstall/install Windows 10. If you want to install using the Windows 10 DVD, you will need to use an external CD/DVD drive which can be plugged in via USB if you do not have a DVD drive already installed on your computer.
I'll explain how to boot from DVD first because it is easiest. You can simply press F7 when you boot the computer, then you can select the DVD drive with the Windows 10 DVD inserted. If you for some reason cannot access the boot menu by pressing F7 on startup, we will need to change the boot device priority order in the BIOS.
1. Plug in the external DVD drive and insert the Windows 10 DVD
2. Boot to BIOS by pressing F2. Inside of the BIOS go to the 'boot' tab, and either arrange the DVD drive to be the first on the list or select where it says, 'change boot device order' and then arrange the DVD drive to be the first boot device in the menu.
3. Exit the BIOS and save your changes. When the computer reboots, it should begin to boot from the DVD. You will need to press any key to begin the installation.
To boot from USB, we are going to need to create a bootable USB stick. To do this, we are going to need to download an ISO image of Windows 10 from this site here: (please select the proper version, i.e. windows 10 home) http://windowsiso.net/ and also the Windows 10 USB utility tool. https://www.microsoft.com/en-us/software-download/windows10#d2784474-fdb0-4e9d-9e47-5e88c0e053ec
This guide includes pictures and explains the exact process on how to use the ISO file you downloaded from windowsiso.net to create a bootable USB stick: http://www.thewindowsclub.com/windows-10-media-creation-tool-create-installation-media-upgrade
If you follow the instructions in this guide (install the W10 USB utility, plug in your USB stick, use the ISO file in the W10 USB utility to create a bootable USB stick), you will have a bootable USB stick with a Windows 10 image on it. From there, you will be able to install a clean copy of Windows 10 on your computer.
Please begin either creating the USB stick or preparing the DVD for install when you are ready.
Now that we have just finished creating a bootable USB stick for Windows 10 installation. Now, we will boot from that USB, and we will format the drive + install a fresh copy of Windows 10.
1. Insert the USB stick into the computer and boot the computer.
2. Hold down F7 to bring up the boot menu (easiest) or change the boot priority order by entering the BIOS by holding F2
3. Boot from the USB stick by either rebooting, or selecting from the boot menu. The computer will begin to load the Windows 10 installation and prompt you to press any key to begin installation.
From here, the Windows 10 installation process will begin. What we need to do is erase all old partitions on the hard drive, and start with a fresh install of Windows 10.
Go through the setup process normally until you see the 'Which type of installation do you want?' screen. Select the 'Custom' option to ensure you'„¢re performing a clean install and not an upgrade install.
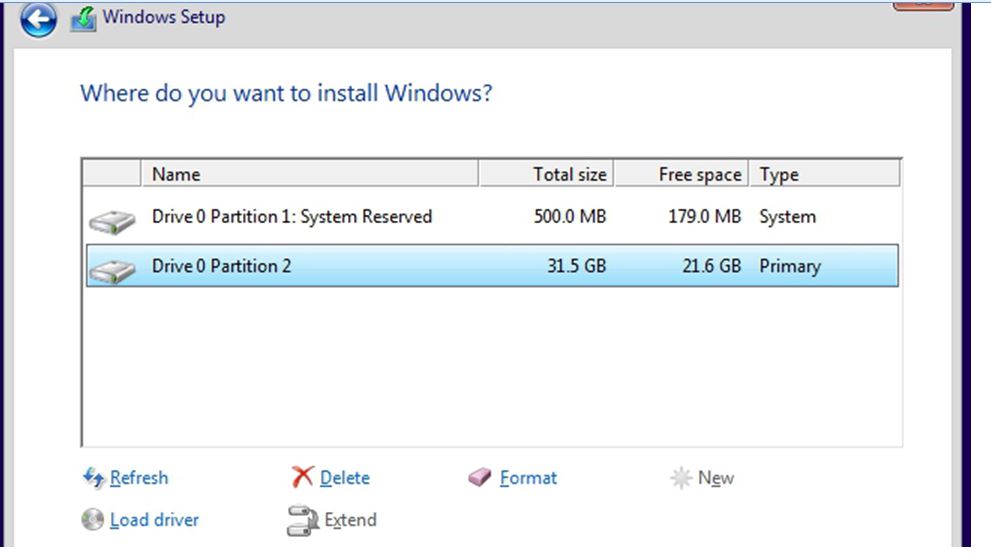
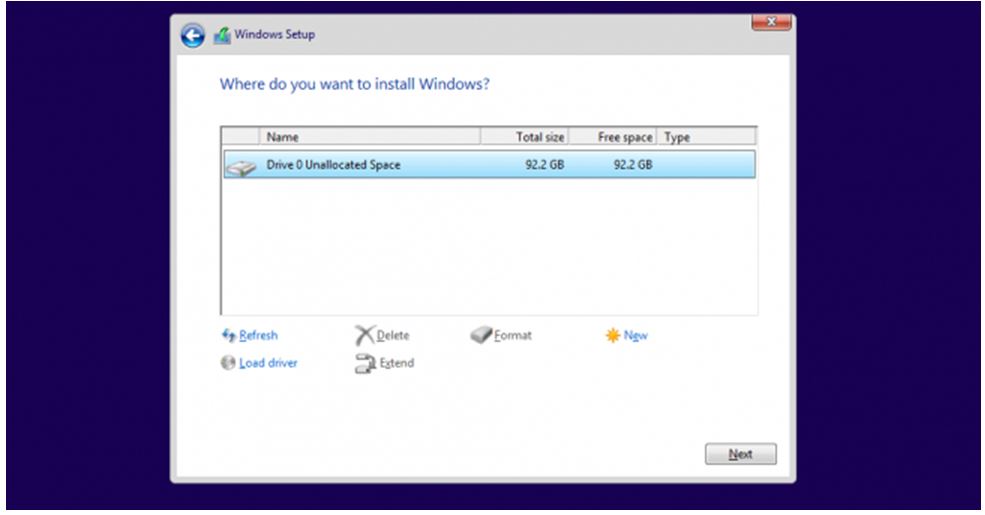
Delete all the partitions when you reach the screen seen below by clicking 'delete' with the drive partition highlighted. Keep clicking delete until all partitions are deleted and there is nothing but unallocated space left. Now, with the drive selected, tell Windows 10 to install itself in the unallocated space by clicking 'next'
After partitions are deleted it should look like this:
Once you click 'next' Windows 10 will begin to install. Once the install is complete, the computer will reboot several times and then you will be brought to the Windows 10 desktop.
Next, you will need to install the correct drivers, You can refer to your original DVD for the initial install but eventually should update any new drivers. Look for the motherboard model number on the bottom of your M-Tech Laptop or find the barcode serial number that begins with PS2 and e-mail this to your support representative and they will provide you with the correct and current driver set for your specific laptop model.
Now that we have finished installing Windows 10, the hardest part is over. All we have to do now is install the hardware drivers for your system.
-Always install chipset drivers first.
The drivers on our website are in the correct order, meaning that the chipset driver is always installed first.
From there, you can install all of the rest of the updates and you do not have to restart in between installations. Most systems have multiple Graphic and Wi-fi card options. Make sure you choose the correct one for your model. If in doubt, send over the serial number previously mentioned and we can send you the list of the correct components.
After all the drivers are installed, the hardware should be functioning properly. You can check to see if all hardware is installed by right-clicking the start menu, then select 'device manager'. If there are any yellow exclamation points in the device manager, that means there are drivers that are not installed. If there are no yellow exclamation points, that means all drivers were installed correctly and you are OK to proceed with using the computer as normal.
Aty this point you should lock in this operating systems clean install by typing in the help menu in the lower left corner the words 'Backup and Restore' A menu option will appear and you should select that. On the left-hand sidebar column will be two options.
1: Create a System Image and
2: Create a System Recovery Disc.
Create the system image and have it on the 2nd drive on your laptop. If you do not have two drives then obtain an external drive or better yet, an SDXC card and save it there. This will allow you to restore to a clean O.S. within minutes, not the hours an initial install take. Then create a System Recovery Disc which is a bootable DVD. This will allow you to boot into your laptop if your C drive should be so corrupt you can no longer boot into Windows.
Beware that if you choose to use Windows backup for your data, you will need to make sure that you look for a checkbox that asks you if you also want to make another System Image. Make sure it is unchecked since this will overwrite your initial System Image. You also can create a hidden directory and drag and drop a copy of the system image there to create a 2nd copy that will not be overwritten.
Good luck and don't forget, the M-Tech Technical Support staff are here to help if you should find yourself in a bind.
If you have any further questions, feel free to give us a call or you can always email support. 626-243-3284 9-5 Pac. time or support@m-techlaptops.com
John - M-Tech Support Representative
